Thursday, September 26, 2013

2 Year Old Birthday Tea Party Theme


Below is a bunch of stuff I made for my 2 year old's birthday party. 

Tea Party Theme

Above is the cupcake tower topper.  


What I did:
Tea pot from the thrift store
Spray painted flat black
 Painted a 2 on it and put puffy paint polka dots 
 Hot glued the flower and ribbon to match the colors of the party 


Here is the cupcake tower. 

What I did:
Bought white cake bases from Michaels craft store and spray painted them flat black. 
Got a dollar store glass bowl, spray painted it flat black,  and hot glued it to the cake bases to create the different levels. 
Bought cupcakes and cake balls and then put flowers on toothpicks and stuck them in the cupcakes


Dum dum lollipop decoration. 

What I did:
Bought a flower pot
Spray painted it black 
Put a orange ribbon on it
Styrofoam ball stuffed with dum-dum lollipops 
Took 4 bags of lollipops to make it. 


Tea bar:

What I did:
Teapot wood pre cut from Michaels Craft Store. 
Spray painted it with chalkboard paint.  4 coats
Wrote T Bar on it. (my daughters name is Taylor) You can put Tea
Little boxes to hold tea bags. Michaels Craft store. 
Spray paint the little boxes flat black 


Personalized bubble wand gift. 

One of the favors for the party is a personalized bubble wand. 

What I did:
Thrift shop tea pot spray painted black holds them. 
The tags on the bubble wands is foam with a white paint for the letters.  I wanted them to look like mini chalk boards. Added the ribbons that match the colors of the party. 


More spray painted teapots with accents of the color of the party on them. 

The smallest teapot is holding the crayons for the coloring activity. 

What I did:
I used construction paper that matches the party and glued on the birthday cake for the kids to color them. 


Make a wand station. 

What I did:
Bought wands that match the party from the dollar store. 
Bought a bunch of stickers and rhinestones that are self adhesive. 
The kids loved sitting at the little table and sticking stuff on the wands. 


A bunch of frames spray painted to match the party. 

The top picture is of my daughters art work. 

Just random decorations around the house. 


Tea bag sugar cookies. 

I am no bakers... I just used a sugar cookie box to bake these. 


Watermelon teapot. 

I found instructions on how to do this online. 
I added blueberries later in the day, but forgot to get a new pic. 


Made her party hat out of scrap booking paper, ribbon and hot glue. 


#2 for the front door


What I did:
Cut out the shape from styrofoam 
Stuck the flowers in and put a dab of hot glue to make it stay. 
Hung with ribbon 


Pin the tea cup on the tea pot. 

What I did:
Painted this on a large brown paper bag. 
Cups are made out of foam and stuck on with reusable glue dots. 

I hope this give you lots of ideas for a great tea party. :) 


Wednesday, September 25, 2013

Tea Party Thank You Cards


What you need:
Cricut Mini
Black card stock 
Orange card stock
Yellow card stock
Red card stock
White card stock
Circular rhinestones
Glue stick
Bakers twine 


This was the firs time I used the Cricut Mini. .... LOVE! 

When making this thank you card you glue 2 tea cups back to back so you can make a little pouch for the tea bag to go in. 


I used the bakers twine to make it look more like a tea bag. 

Write your thank you on the tea bag and stick it in the cup.


Tuesday, September 24, 2013

Painted Pumpkin Clown


What you need:
White plastic pumpkin (Michaels Craft Store)
Elmer's Painters Pens (Michaels Craft Store)
Crayola Molding clay (Michaels Craft Store) In Red
Orange fake cobwebs (Michaels Craft Store)
Pencil
Hot glue gun
Staple gun
Hard Hair spray
Big bowl
White Puffy Paint


What I did:
  1. Pencil on the face that you want to paint on your pumpkin.  I chose a clown... A creepy one ;)
  2. Use the paint pens to color it in.  I only had to do 2 coats for perfect coverage. 
  3. Use a big bowl to put the pumpkin in to keep it from rolling around. 
  4. Mold the red nose out of the Crayola molding clay.  It dries on it's own over night. 
  5. Let the paint and the nose dry over night 
  6. Glue on the nose with a hot glue gun 


7.  Use white puffy paint to make the center of the eyes. 
8.  Let the puffy paint dry 
9.  Use the orange fake cobwebs for hair.  Staple gun it on and pull on it to give it a cool shape.


10. Use a strong hold hairspray to keep the shape.  


11.  Scare all the neighbors!! *Evil Laugh* 


Monday, September 23, 2013

Wood-Burning Tips and Tricks for Beginners


I got totally into wood-burning about a year ago. On this blog there are a couple of examples of my work and little tips and tricks that I found out in my playing with wood-burning. 

I got this wood-burning tool and any tips I offer are associated with this tool considering it is the only one I have used. 


These are tips and tricks for beginers


I bought all my wood at Michael's Craft store. 


Some of the wood I used:
A slice of tree with the bark still on
A wood bangle bracelet
A frame
Finished wood plaques
Wine bottle holder


I noticed that this wood burning tool did much better on smaller projects.  I feel like the tool could not sustain high temperatures for a long time,  so residue would build up on the tip of the burning tool and I would have to turn off the tool and scrub off the residue before I could continue with my project.  Possibly, I should have bought a more expensive tool, but I didn't know if I would enjoy burning. 


I found that softer/smoother woods were better than rough/knotty wood. The burner would get stuck in any inconsistencies and cause dark spots in the burn. 


I learned that I had to draw what I wanted to burn on the wood with a pencil first.  When i tried to freehand the burn it was a disaster. I would even print up templates from the internet and then trace it on the wood with tracing paper. 


This wine bottle case was one of my favorite burns. People love wood burnt gifts. They aren't supper hard, but look expensive. Give it a try it's fun! 


PS.  A lot of my wood-burning inspiration came from this artist. 

Saturday, September 21, 2013

New baby shadow box


What you need:
Shadow box (Michael's craft store)
Wood Letter
Wood frame
Blingy flowers
Scrapbooking paper
Mementoes from the babies birth
glue stick
hot glue
wood-burning tool 


What you need to do:
  1. Gather all the mementoes from the babies birth.  I chose one of her first onsies, her hat she wore after birth, a headband from her first photos shoot, her info card from the hospital and her foot print. 
  2. Arrange the items in a cute way
  3. Open the shadow box
  4. Lay scrap book paper in the bottom and glue stick it on. 
  5. Hot blue the mementoes on.
  6. Add wooden frame with picture. I burnt the little birds on it with the wood-burning tool. 
  7. Add the wooden letter.  I also burnt on this.  You could paint it too to match. 
  8. Add blingy flower or anything else that will go with the theme of the shadow box
  9. Hot glue everything down so it doesn't move 
I can't tell you how happy this box makes me every time I walk by it. This is one of my most cherished crafts.

Enjoy :) 


Friday, September 20, 2013

Custom Bleach Pen Shirt

Custom Bleach Pen Shirts! 


What you need:
Cotton Shirt 
Hard plastic for between the shirt.  (I used a cutting board)
Clorox Bleach Pen 

What you do:
  1. Put the hard plastic in the shirt to protect the bleach from bleeding through. 
  2. Take your bleach pen and draw whatever you want. 
  3. Let the bleach sit for about 10-15 minutes.  May need to test a small section to make sure the desired color is achieved.  If it's not the right color reapply the bleach to the area you tested. 
  4. Rinse the bleach off.
  5. Wash and dry the shirt
  6. Wear your work of art with pride. 
In my experience this does work better on darker color clothes.  The pink one turned out white and the black one turned out orange. You could definitely see the difference in the fabric on the black one better than the pink one. 

Have fun!! 


Thursday, September 19, 2013

Baby's Bundle O' Stuff... Baby shower gift.

Baby's Bundle o' Stuff! 


What you need:
Basket
Newborn diapers
Receiving blankets
Newborn socks
Wash clothes
Pen
Straight pins
Anything else you want to tuck in there.


What you need to do:
  1. Roll up newborn diapers and secure them with a push pin. 
  2. Take a newborn sock and roll it down to make their hats
  3. Swaddle the diaper with the washcloths. Secure with pin.
  4. Draw little eyes and eyebrows on the exposed part of the diaper. 
  5. Put the rest of the unrolled diapers in the bottom of the basket to fill it up
  6. Put the receiving blankets on top of them to make it look like a crib. 
  7. Arrange the little bundles of joy to look cute. 
  8. Lastly put a tag on the basket to explain what is in the basket. 


Happy and useful! :) 


Wednesday, September 18, 2013

Vacation Picture Magnet


I love to collect picture frame magnets from all the places my family travel to.  When we went to Cape May, NJ last year we couldn't find one.  So I made one! 

What you need:
Hot glue gun
Clear picture frame magnet (dollar store)
Assorted items from your trip
A picture from the trip


My assorted items from the trip were the key holder from the hotel, a pin that says cape may that I found in a gift store and the little rocks that are called Cape May diamonds.  They are found on the beach there. 

What you do:
  1. Put the picture in the picture frame.  
  2. Glue the edges of the picture frame shut so the picture doesn't fall out. 
  3. Arrange your items so they look good around the picture 
  4. Glue the items on the frame

Out of all the store bought magnets I bought this one is my favorite.  It's more personal. :) 


Tuesday, September 17, 2013

Alien theme toddler photo shoot

I wanted to do a cute photo shoot for my daughters 18 month birthday.  My maternity shoot was an alien theme, so I thought it would be cute to pull the alien theme full circle. I made most of the props myself.  Below I will go over how I did it.  First here are a couple of the pictures from the shoot. 


The most important thing about a great photo shoot is a great photographer. www.BriJohnson.com was my girl for this job.


Now on to the homemade props. 

First the backdrop

What you need:
MDF board 4 foot x 8 foot (Home Depot)
Flat black paint 
White paint
Pencil


What you need to do:
  1. Paint the MDF black.  We did 3 coats.  We chose flat black to give it a more chalkboard appearance. 
  2. Sketch with a pencil the large planet. 
  3. Paint with white over what you sketch. 
  4. Fill in the gaps with stars. 


Prop chair 

What you need:
Kids saucer chair (Walmart)
Twin size sheet 
Binder clips


What you need to do:
  1. Take the sheet and lay it over the saucer chair. 
  2. Use binder clips to secure it . The back doesn't have to look good - only what will be seen on camera does. 


Lots of other props for the shoot. 

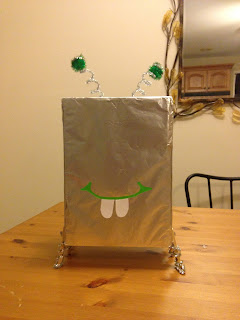
Box aliens
2 different alien headbands


What you need for the headbands:

Pre-made headbands (Michael's Craft Store)
Glitter foam paper (Michael's Craft Store)
Googly eyes (Michael's Craft Store)
Pipe-cleaners (Michael's Craft Store)

What you need to do:
  1. Cut out the glitter foam paper in the shape you need. Most of them come with self adhesive papers, so you can just cut a little tab and glue it to itself.  A little hot glue would work too. 
  2. Hot glue googly eyes. 
  3. Twist on some pipe-cleaners for antenna. 


Box alien sans goggly eyes. 

Box Aliens

What you need:
Empty cereal boxes
Elmers glue
Googly eyes
clothes pins 
pipe-cleaners
Green paint 
pom pom balls 
aluminum foil 

What you need to do:

  1. Wrap empty cereal boxes with aluminum foil.  
  2. Glue half a clothes pin for legs... I did 4 legs per box
  3. Glue on googly eyes
  4. Paint a smile and eyebrows. 
  5. Glue on pipe-cleaners for antena
  6. Put a pom pom ball on top of the pipe-cleaner antennas 
  7. Another option is to cut out construction paper for a tongue or teeth. Just glue that on too. 


For one of the shots I taped this little alien guy to the back drop.  

What you need:
Construction paper
Googly eyes
Black sharpie
Pom poms

What you need to do:
  1. Cut your alien shape out of the construction paper. 
  2. Glue on googly eyes
  3. Glue on pom poms 
  4. Draw on a smile. 


Alien mask

What you need:
Glittery foam paper
Ribbon

What you need to do:

  1. Cut your mask shape. 
  2. Hold it up to the child to make sure it fits. 
  3. Use ribbon on both sides of the mask to tie it on the child for the shoot. 


Colorful stars

We hung 3 of these on the back drop to add color. 


What you need:
3 different sized wood stars. 
4 different color paint

What you need to do:
  1. Paint all the different sized stars different colors 
  2. Hot glue them all together. 
  3. Paint a highlighting color around each star. 


Unfortunately I am just now learning to sew, so the costumes were bought on etsy... I fully plan to 
make them for her next shoot :) 


This shoot was also featured on

Check it out for more pictures and info.